-
Using Dependabot to Maintain Docker Image Dependencies
One of the challenges in modern software development is keeping on top of your dependencies.
There are many tools out there to help you wrangle your dependencies; if you use GitHub, you have most likely come across Dependabot. This post isn’t an introduction to Dependabot. It presents a way to automatically maintain Docker image versions referenced by your infrastructure, without giving up control of when those updates happen.

Image from XKCD 2347 - Creative Commons Attribution-NonCommercial 2.5 License
Overview of Dependabot Docker
Dependabot already supports updating a large number of different types of dependencies, including DockerFiles. You just need to add a configuration and it will automatically raise pull requests when there is a new version of your base Docker image.
For example, I might have a Docker image built from the base image
ubuntu:24.04:# ./DockerFile FROM ubuntu:24.04 WORKDIR /app # COPY files/install things, etcWhen a new version of the ubuntu image is released, I get a Pull Request…
-FROM ubuntu:24.04
+FROM ubuntu:24.10

WORKDIR /app
# COPY files/install things, etc
I can review the Pull Request, read the release notes, check for any issues, and, if all is well, accept the new version of Ubuntu.
This all works out of the box, but having a clear understanding of this will help me explain the solution later.
The Problem
When you host a container application, such as in AWS Elastic Container Service (ECS) or Azure’s Container Apps you can either host your own image from your own repository (e.g. Elastic/Azure Container Registry), or reference an image from a public registry such as Docker Hub / AWS Public ECR.
If you are building your application into a Docker image and running that image in a container service, you won’t have this problem because you will be tagging the image and instructing the container service to use it when you deploy a new version.
For example, an abridged deployment might be:
- Container service running
MyApp:v1 - Build and publish
MyApp:v2(e.g. docker build and push) - Instruct container service to run
MyApp:v2(e.g. update via terraform) - Container service running
MyApp:v2
However, there are cases where you are running some public image in your container service. It might be nginx acting as a reverse proxy, or fluentbit in a sidecar configuration to provide advanced logging capabilities.
In these cases you have two choices as to how you tell your container service which image you would like:
- Use the
latesttag, e.g.nginx:latest - Use a specific version tag, e.g.
nginx:1.27-perl
Both have their pros and cons:
Approach Pros Cons Latest tag Low maintenance, automatic updates Lack of control over updates Specific tag Control over versions Requires manual updates The tag you use will usually end up stored somewhere in your infrastructure as code. For example, for AWS ECS and Terraform you have it in your ECS Task Definition JSON:
"containerDefinitions": [{
    "name": "nginx",
    "image": "public.ecr.aws/nginx/nginx:latest",
    "memory": 256,
    "etc": "etc",
}]
If you are using the
latesttag approach, you lose control of when your application takes an updated version of the image.If there is a new
latesttag ofnginxand that contains a critical problem, next time a new ECS Task is deployed you will get that problem in your application. You won’t be able to rollback either, because it will still use thelatestimage.If you are using a specific version tag, like
1.27-perlyou no longer get automatic updates. Instead, you have to remember to check for updates tonginxat regular intervals, and watch out for CVEs that might place your application at risk, and then go in and manually change the version number.The benefit of Dependabot is that it just tells you when there’s a new version. Wouldn’t it be good if you could still reference a specific version tag, but also have Dependabot tell you when there is an update available via a Pull Request?
The Solution
To get the best of both worlds you need a way for Dependabot to monitor a specific version tag that is buried in your code. We already know Dependabot can maintain a base Docker image version.
I’ll continue the example assuming you are using AWS ECS and images from their public ECR. This should work fine for Azure and other Container Service Providers, as well as other Docker image Registries like DockerHub - so long as Dependabot supports the Image Registry.
First, we need to get the specific version tag out into a place where Dependabot can deal with it.
Fake Docker File
Start by creating a new folder for “3rd Party Images” and in there a folder for each image tag. Then create a
DockerFilereferencing a specific tag.# Create a new folder for 3rd Party Images and an nginx sub folder mkdir -p ./third-party-docker-images/nginx/ # Change to that new folder cd ./third-party-docker-images/nginx/ # Create a DockerFile echo "FROM public.ecr.aws/nginx/nginx:1.27-perl" > DockerFileThis will leave you with a DockerFile like so:
FROM public.ecr.aws/nginx/nginx:1.27-perlThis will be a “Fake DockerFile” who’s only purpose is to be monitored and updated by Dependabot. You don’t need to do anything else with it, but adding some comments or a readme file will help.
If you have other images, add another folder in
./third-party-docker-images/whateverwith anotherDockerFile.Configure Dependabot
Next configure Dependabot to keep an eye on a Fake DockerFile:
# ./.github/dependabot.yml

version: 2
updates:
  # Update nginx third party image
  - package-ecosystem: "docker"
    directory: "/third-party-docker-images/nginx/"
    schedule:
      interval: "weekly"

  # Lots of other dependencies to watch...
Whenever Dependabot runs it will raise a Pull Request if there is a newer version of
nginx.Wiring the Version
The final step is to get the image tag from the DockerFile so that you can reference it in your infrastructure as code.
Use whatever scripting language you are comfortable to read the file and get the image tag:
Some examples in bash and PowerShell are below:
Bash
# Read the first line of the file
contents=$(head -n 1 ./DockerFile)

# Get the full image tag
imagetag=$(echo $contents | sed -E "s/FROM (.*)/\1/g")

# Get just the version
version=$(echo $contents | sed -E "s/FROM.*:(.*)/\1/g")
PowerShell 7
# Read the first line of the file
$contents = Get-Content .\DockerFile -Head 1

# Get the full image tag
$imagetag = $contents.Split(" ")[1]

# Get just the version
$contents -match "FROM.*:(.*)"
$version = $Matches[1]
These are not fool proof ways to parse DockerFiles, but work for simple examples. Your mileage may vary.
If your Task Definition is using the full image tag from a public Docker Registry then you can just use the
$imagetagvariable and pass that into your Infrastructure as code.You just need some place in your deployment script to get the value of the image tag and pass it into terraform:
e.g.
export TF_VAR_nginx_image_tag="$imagetag"
#or
terraform plan -var 'nginx_image_tag=$imagetag'
And in your Task Definition JSON:
"containerDefinitions": [{
    "name": "nginx",
    "image": "${var.nginx_image_tag}",
    "memory": 256,
    "etc": "etc",
}]
Using a Pull Through Cache
The reason I have shown the
$versionvariable is because I use a Pull Through Cache on ECR - just to ensure public images don’t disappear on me - and that has a different repository address to the public one:"containerDefinitions": [{ "name": "nginx", "image" : "${var.ecr_cache}/nginx/nginx:${var.nginx_version}", "memory": 256, "etc": "etc", }]In my Fake DockerFile I still reference AWS’s Public ECR. But in my Task Definition JSON I am referencing a variable pointing to my Pull Through Cache’s address (which is dynamically constructing it from other variables in terraform).
You could have
nginx/nginx:1.27-perlin the$versionvariable, if you prefer to do things that way, just update the script to parse theFROM ...correctly.Conclusion
You can’t always have your cake and eat it.
But, after been burned by a rouge
latesttag (it wasn’t fromnginxby the way) I needed a way to be able to take control of when new versions were introduced into my application. I needed to have a way to be able to revert them if they went rouge. And at the same time, I wanted Dependabot to manage it alongside all the other dependency updates that were going on.Another benefit to this approach, is that it centralises the Docker image versions in a repository, so if you have multiple applications, each using the same version of a Docker image you can keep them in sync. If you don’t want to sync them, you can just have two separate DockerFiles - e.g. one to take minor updates, one to take nightly updates.
With the above changes I managed to get the best of both.
- Container service running
-
An Introduction to Runbooks
It has been a long time since I’ve written anything just due to how busy I’ve been. I have a few articles planned, and hopefully can get back to writing at a regular cadence.
I’m going to take a look at runbooks, I’ll be covering:
- What is a Runbook?
- When should you create them?
- How do you organise them?
- What should be in them?
Story
I’ve been working for the last two years on transitioning a service from running somewhere deep inside a data centre, where it was managed by an Ops Team and updates were scheduled through a Release Management team, to running in AWS where the development team deploy, manage, monitor and update it.
During this time I’ve been looking into a lot of things in the DevOps and Site Reliability Engineering (SRE) space to ensure that the service I am responsible is up and running at all times.
Whilst on a call someone mentioned mentioned “executing a runbook” to resolve a problem. I had previously only heard of runbooks in the context of Microsoft System Centre and was amazed that teams were using similar approaches on an AWS native service without any Microsoft stuff. Hoping to bring some of these into my service, I reached out for more information, expecting some code or configuration for AWS, but instead I was told none of them were automated, these were just documented processes that people followed.

Image by jkfid from flickr - Attribution (CC BY 2.0) Understanding the value
I was a little crest fallen, “anyone can write a manual process, it wasn’t hard”, I thought.
But, I’d not done it!
I had no processes documented for such situations!
I started to look at the problems I might have with my service and what steps I might take to resolve them. There were a few things I knew, but had never written down. “How would someone else deal with it if I was on holiday?”, “Would I remember what to do in 12 months time?”. These were all things I should put into a runbook.
Now, I needed somewhere to store them. We use Atlassian Confluence, but any shared team documentation would suffice: OneNote, ADO or GitHub Wikis, Google Docs, any place your team keeps their documentation and can easily collaborate.
I setup a “parent” page for “Runbooks” with a quick intro and a table of contents, and then created my first runbook.
Just because it is a manual process doesn’t mean there’s no automation. It may be as simple as updating a line in a JSON configuration file in your repository and performing a standard deployment. The point is, to have a process documented telling you when and how you do it, and that it is clear.
When to create one
I only create runbooks for processes that relate to production systems and things I don’t do every day.
Good candidates: Servers dying, certificates rotating, overnight jobs failing, etc.
Poor candidates: How to setup a development laptop, how to perform a release - these are documented, but they don’t meet the bar for creating a runbook - put them in another section.
If you don’t set the bar high, you have processes for anything and everything, and managing them becomes onerous. Keeping them focused means you have a small selection of procedures that cover the most important processes.
Structure
My runbooks have a simple structure. There is a Trigger and a Process, but I also have some metadata such as who owns it, when was it last updated, etc.
Sometimes I will maintain a log of when it was last run, for example, certificate rotation has a log of when it was rotated, and when it will next expire.
Triggers
Triggers explain when to invoke a runbook. For example, it could be as simple as “If a server dies”. Or something a bit more involved “If X job fails, check the logs for A event, then follow process 1, otherwise follow process 2”. I will nest runbooks so top level ones cover a scenario and child runbooks cover different solutions to the same overall problem.
e.g.
- Process X failed - Trigger: process X has not completed
- Process X.1 failed - Trigger: check the logs and see if X.1 completed
- Process X.2 failed - Trigger: check the logs and see if X.2 completed
Process
The process is a list of steps you need to follow. I’ve not needed to use flowcharts yet, just using bulleted lists is enough. I ensure each step is clear and has examples of things you expect to find.
e.g.
To resolve the issue with the Server follow these steps:
- Locate the server IP
- Start, Run, cmd.exe
- Type
ipconfigand press Enter - Look for
IPv4 Address. . . . . . . . . . . : 192.168.0.1- If there is more than one
IPv4 Addressyou want the one starting192.168.0.
- If there is more than one
- Enter the server IP from step
#3into the box labelled “Server IP” - Etc.
Types of runbooks
There are two main types of runbook I have created:
- Business as Usual (BAU)
- There’s a problem
BAU
BAU runbooks cover any maintenance tasks that need to be performed on a semi-regular basis, for example, the creating a new SSH Key, adding a new admin user, etc.
The trigger for a BAU runbook is usually some business process or event. These things are expected to happen and the runbook is just a record of the steps needed.
I label the BAU runbooks with
[BAU]in the title so I can tell which is which.Problem
Problem runbooks are to be invoked when something goes wrong and it requires manual intervention to remediate. For example, a release goes live and errors increase, or an overnight process doesn’t run.
The trigger should be some alert from your monitoring solution. The process is a list of steps to identify what has gone wrong and what needs to be done to remedy the problem.
Examples
Above I’ve mentioned the structure of the pages and the structure of a runbook. I can’t replicate my runbooks, but I’ll show some hypothetical examples.
Example pages
- Production Runbooks
- Runbook - Server Dies
- Runbook - Job X Fails
- Runbook - X.1 Failed
- Runbook - X.2 Failed
- Runbook - [BAU] Rotate SSH keys
- Architecture Documents
- Project Documents
An example of the structure of a team’s documentation site
Example runbook
Name Server Dies Description Process to follow when a server dies Date 15-Jan-2025 Version 2 Owner Dave Trigger
This runbook is to be executed when a email alert is received informing you a server has died, or if you notice a server isn’t responding.
NOTE: if this is because of maintenance, you don’t need to do anything as the engineer will restart it when they are done.
Process
- Check the email alert for the name of the server (it will be after the heading Server: - e.g. Server: sv01)
- Run the “Restart Server Tool”
- Enter the name of the server from step
#1into the box labelled “Server to restart” - Press the “Restart” button.
- Read the logs looking for “Server xx online” (where xx is the server name).
- If this doesn’t appear in 10 minutes, raise an incident (link here).
References
- Documentation for “Restart Server Tool”
- Process for Raising an Incident
An example, to show what I might have in a runbook.
Best practices
Here are my best practices for runbooks.
Review them regularly
On a Friday afternoon, or that boring meeting you can’t get out of, have a browse through and make sure they still make sense. When you write things you often do it from a position of understanding, and only in time do you realise you have missed a vital instruction. “Reboot the server” may be a valid instruction, but if you are SSH’d into a Linux server, do you know the exact command to trigger an immediate reboot?
Test them
If you have not actually performed the steps you cannot be sure your runbook is going to help you when you need it. If possible, test your process by following the steps, or better yet, have someone else follow it whilst you observe.
However, sometimes you cannot test them if they require outside coordination. In these cases it is still better to have them than not (see “Prepare for the Worst”).
Prepare for the worst
I have a number of runbooks I have never run, for events that I hope never happen. These are for scenarios that are rare but would be a big problem if they triggered. By writing down the most likely steps needed to resolve the problem, I give myself a head start.
Remember to create them
If you are doing a manual process for something with production and you realise “this is a bit complicated, I bet won’t remember this”, then it is an opportunity to create a runbook.
Golden rules
Runbooks should be:
- All in one place - don’t have them all over the place, they should be easy to find.
- All for the same purpose - runbooks are for production related processes - they don’t explain how you setup a new laptop.
- Focused - Each runbook should be one trigger that explains if this need running, and a process that explains what to do. Create nested runbooks if needed.
The power of runbooks
By giving these processes a name, defining a scope, keeping them simple and putting them all together you have a powerful suite of processes for dealing with production issues.
Road to automation
Above, I said I was “crest fallen” when I found out these were manual processes, and not some amazing feat of automation, so why am I espousing the values of manual runbooks and not trying to just automated them all?
Simple. Perfect is the enemy of good.
If I waited until I could automate every process, I wouldn’t have any runbooks yet.
You have to balance the time it would take to automate these things with how much value it would provide. Some processes are very complex to engineer, and happen very rarely. Some would require you to build a whole new solution to perform a task that takes 10 minutes once a quarter. It isn’t always suitable to fully automate these processes.
By creating a manual runbook first, you can understand the process and measure the time spent performing it, and then make a business decision if automation is the right approach.
Conclusion
The lack of automation was a surprise at first, but once I got over myself, I realise how beneficial manual runbooks can be. It’s relatively simple to set them up using the tools you already have, and then if something goes wrong, you are prepared.
These sort of things may be common in Ops led services, but where the development team owns and operates them, this level of maturity is definitely still needed. DevOps must include the benefits of Development and Operations.
-
Giraffe Development in 2022
This post is part of the F# Advent Calendar 2021. Many thanks to Sergey Tihon for organising these. Go checkout the other many and excellent posts.
This year, I’ve run out of Xmas themed topics. Instead, I’m just sharing a few tips from a recent project I’ve been working on…
I’m going to show…
- Dev Containers for F# Development
- A simple Giraffe Web Server
- Automated HTTP Tests
- Working with ASP.Net dependencies
You can see the full source code for this project on GitHub here
Dev Containers
Dev Containers are a feature of VS Code I was introduced to earlier this year and have since taken to using in all my projects.
They allow you to have a self contained development environment in DockerFile, including all the dependencies your application requires and extensions for Visual Studio Code.
If you have ever looked at the amount of things you have installed for various projects and wondered where it all came from and if you still need it - Dev Containers solves that problem. They also give you a very simple way to share things with your collaborators, no longer do I need a 10-step installation guide in a Readme file. Once you are setup for Dev Containers, getting going with a project that uses them is easy.
This blog is a GitHub Pages Site, and to develop and test it locally I had to install Ruby and a bunch of Gems, and Installing those on Windows is tricky at best. VS Code comes with some pre-defined Dev Container templates, so I just used the Jekyll one, and now I don’t have to install anything on my PC.
Dev Container for .NET
To get started, you will need WSL2 and the Remote Development Tools pack VS Code extension installed.
Then it just a matter of launching VS Code from in my WSL2 instance:
cd ~/xmas-2021
code .
Now in the VS Code Command Palette I select Remote Containers: Add Development Container Configuration Files… A quick search for “F#” helps get the extensions I need installed. In this case I just picked the defaults.
Once the DockerFile was created I changed the
FROMto use the standard .NET format that Microsoft uses (the F# template may have changed by the time you read this) to pull in the latest .NET 6 Bullseye base image.Before
FROM mcr.microsoft.com/vscode/devcontainers/dotnet:0-5.0-focalAfter
# [Choice] .NET version: 6.0, 5.0, 3.1, 6.0-bullseye, 5.0-bullseye, 3.1-bullseye, 6.0-focal, 5.0-focal, 3.1-focal
ARG VARIANT=6.0-bullseye
FROM mcr.microsoft.com/vscode/devcontainers/dotnet:0-${VARIANT}
VS Code will then prompt to Repen in the Dev Container, selecting this will relaunch VS Code and build the docker file. Once complete, we’re good to go.
Creating the Projects
Now that I’m in VS Code, using the Dev Container, I can run
dotnetcommands against the terminal inside VS Code. This is what I’ll be using to create the skeleton of the website:# install the template dotnet new -i "giraffe-template::*" # create the projects dotnet new giraffe -o site dotnet new xunit --language f# -o tests # create the sln dotnet new sln dotnet sln add site/ dotnet sln add tests/ # add the reference from tests -> site cd tests/ dotnet add reference ../site/ cd ..I also update the projects target framework to net6.0 as the templates defaulted to net5.0.
For the
site/I updated to the latest giraffe 6 pre-release (alpha-2 as of now) and removed the reference toPlywhich is no longer needed.That done I could run the site and the tests from inside the dev container:
dotnet run --project site/

dotnet test
Next, I’m going to rip out most of the code from the Giraffe template, just to give a simpler site to play with.
Excluding the
open’s it is only a few lines:let demo = text "hello world" let webApp = choose [ GET >=> choose [ route "/" >=> demo ] ] let configureApp (app : IApplicationBuilder) = app.UseGiraffe(webApp) let configureServices (services : IServiceCollection) = services.AddGiraffe() |> ignore [<EntryPoint>] let main args = Host.CreateDefaultBuilder(args) .ConfigureWebHostDefaults( fun webHostBuilder -> webHostBuilder .Configure(configureApp) .ConfigureServices(configureServices) |> ignore) .Build() .Run() 0I could have trimmed it further, but I’m going to use some of the constructs later.
When run you can perform a
curl localhost:5000against the site and get a “hello world” response.Testing
I wanted to try out self-hosted tests against this API, so that I’m performing real HTTP calls and mocking as little as possible.
As Giraffe is based on ASP.NET you can follow the same process as you would for testing as ASP.NET application.
You will need to add the TestHost package to the tests project:
dotnet add package Microsoft.AspNetCore.TestHostYou can then create a basic XUnit test like so:
let createTestHost () =
  WebHostBuilder()
    .UseTestServer()
    .Configure(configureApp)    // from the "Site" project
    .ConfigureServices(configureServices)   // from the "Site" project

[<Fact>]
let ``First test`` () =
    task {
        use server = new TestServer(createTestHost())
        use msg = new HttpRequestMessage(HttpMethod.Get, "/")

        use client = server.CreateClient()
        use! response = client.SendAsync msg
        let! content = response.Content.ReadAsStringAsync()

        let expected = "hello test"
        Assert.Equal(expected, content)
    }
If you
dotnet test, it should fail because the tests expects “hello test” instead of “hello world”. However, you have now invoked your Server from your tests.Dependencies
With this approach you can configure the site’s dependencies how you like, but as an example I’m going to show two different types of dependencies:
- App Settings
- Service Lookup
App Settings
Suppose your site relies on settings from the “appsettings.json” file, but you want to test with a different value.
Let’s add an app settings to the Site first, then we’ll update the tests…
{
    "MySite": {
        "MyValue": "100"
    }
}
I’ve removed everything else for the sake of brevity.
We need to make a few minor changes to the
demofunction and also create a new type to represent the settings[<CLIMutable>] type Settings = { MyValue: int } let demo = fun (next : HttpFunc) (ctx : HttpContext) -> let settings = ctx.GetService<IOptions<Settings>>() let greeting = sprintf "hello world %d" settings.Value.MyValue text greeting next ctxAnd we need to update the
configureServicesfunction to load the settings:let serviceProvider = services.BuildServiceProvider() let settings = serviceProvider.GetService<IConfiguration>() services.Configure<Settings>(settings.GetSection("MySite")) |> ignoreIf you run the tests now, you get “hello world 0” returned.
However, if you
dotnet runthe site, and usecurlyou will seehello world 100returned.This proves the configuration is loaded and read, however, it isn’t used by the tests - because the
appsettings.jsonfile isn’t part of the tests. You could copy the file into the tests and that would solve the problem, but if you wanted different values for the tests you could create your own “appsettings.”json” file for the tests{ "MySite": { "MyValue": "3" } }To do that we need function that will load the test configuration, and the add it into the pipeline for creating the TestHost:
let configureAppConfig (app: IConfigurationBuilder) =
  app.AddJsonFile("appsettings.tests.json") |> ignore
  ()

let createTestHost () =
  WebHostBuilder()
    .UseTestServer()
    .ConfigureAppConfiguration(configureAppConfig)   // Use the test's config
    .Configure(configureApp)    // from the "Site" project
    .ConfigureServices(configureServices)   // from the "Site" project
Note: you will also need to tell the test project to include the
appsettings.tests.jsonfile.<ItemGroup> <Content Include="appsettings.tests.json" CopyToOutputDirectory="always" /> </ItemGroup>If you would like to use the same value from the config file in your tests you can access it via the test server:
let config = server.Services.GetService(typeof<IConfiguration>) :?> IConfiguration

let expectedNumber = config["MySite:MyValue"] |> int

let expected = sprintf "hello world %d" expectedNumber
Services
In F# it’s nice to keep everything pure and functional, but sooner or later you will realise you need to interact with the outside world, and when testing from the outside like this, you may need to control those things.
Here I’m going to show you the same approach you would use for a C# ASP.NET site - using the built in dependency injection framework.
type IMyService =
    abstract member GetNumber : unit -> int

type RealMyService() =
    interface IMyService with
        member _.GetNumber() = 42

let demo =
    fun (next : HttpFunc) (ctx : HttpContext) ->

        let settings = ctx.GetService<IOptions<Settings>>()
        let myService = ctx.GetService<IMyService>()

        let configNo = settings.Value.MyValue
        let serviceNo = myService.GetNumber()

        let greeting = sprintf "hello world %d %d" configNo serviceNo
        text greeting next ctx
I’ve create a
IMyServiceinterface and a class to implement itRealMyService.Then in
configureServicesI’ve added it as a singleton:services.AddSingleton<IMyService>(new RealMyService()) |> ignoreNow the tests fail again because
42is appended to the results.To make the tests pass, I want to pass in a mocked
IMyServicethat has a number that I want.let luckyNumber = 8 type FakeMyService() = interface IMyService with member _.GetNumber() = luckyNumber let configureTestServices (services: IServiceCollection) = services.AddSingleton<IMyService>(new FakeMyService()) |> ignore () let createTestHost () = WebHostBuilder() .UseTestServer() .ConfigureAppConfiguration(configureAppConfig) // Use the test's config .Configure(configureApp) // from the "Site" project .ConfigureServices(configureServices) // from the "Site" project .ConfigureServices(configureTestServices) // mock services after real onesThen in the tests I can expect the
luckyNumber:let expected = sprintf "hello world %d %d" expectedNumber luckyNumberAnd everything passes.
Conclusion
I hope this contains a few useful tips (if nothing else, I’ll probably be coming back to it in time to remember how to do some of these things) for getting going with Giraffe development in 2022.
You can see the full source code for this blog post here.
-
Access modifiers
This post is inspired by and in response to Pendulum swing: internal by default by Mark Seemann.
Access modifiers in .NET can be used in a number of ways to achieve things, in this post I’ll talk about how I used them and why.
Firstly I should point out, I am NOT a library author, if I were, I may do things differently.
Public and Internal classes
In .NET the
publicandinternalaccess modifiers control the visibility of a class from another assembly. Classes that are marked as public can be seen from another project/assembly, and those that are internal cannot.I view public as saying, “here is some code for other people to use”. When I choose to make something public, I’m making a conscious decision that I want another component of the system to use this code. If they are dependant on me, then this is something I want them to consume.
For anything that is internal, I’m saying, this code is part of my component that only I should be using.
When writing code within a project, I can use my public and internal types interchangeably, there is no difference between them.
If in my project I had these 2 classes:
public Formatter { public void Format(); }

internal NameFormatter { public void Format(); }
and I was writing code elsewhere in my project, then I can choose to use either of them - there’s nothing stopping or guiding me using one or the other. There’s no encapsulation provided by the use of internal.
NOTE: When I say ‘I’, I actually mean, a team working on something of significant complexity, and that not everyone working on the code may know it inside out. The objective is to make it so that future developers working on the code “fall into the pit of success”.
If my intention was that
NameFormattermust not be used directly, I may use a different approach to “hide” it. For example a private nested class:public Formatter { private class NameFormatter() { } }or by using namespaces:
Project.Feature.Formatter
Project.Feature.Formatters.NameFormatter
These might not be the best approach, just a few ideas on how to make them less “discoverable”. The point I’m hoping to make is that within your own project internal doesn’t help, if you want to encapsulate logic, you need to use private (or protected).
In larger systems where people are dependant on my project, everything is internal by default, and only made public to surface the specific features they need.
Testing
So where does this leave me with unit testing? I am quite comfortable using
InternalsVisibleToto allow my tests access to the types it needs to.The system I work on can have a lot of functionality that is
internaland only triggered by its own logic. Such as a plugin that is loaded for a UI, or a message processor.Testing everything through a “Receive Message” type function could be arduous. That said, I do like “outside-in” testing and I can test many things that way, but it is not reasonable to test everything that way.
In one of the systems I maintain, I do test a lot of it this way:
Arrange
Putting the system in a state

Act
Sending an input into the system

Assert
Observe the outputs are what is expected
By sending inputs and asserting the outputs tells me how the system works.
However, some subcomponents of this system are rather complex on their own, such as the RFC4517 Postal Address parser I had to implement. When testing this behaviour it made much more sense to test this particular class in isolation with a more “traditional” unit test approach, such as Xunit.net’s Theory tests with a simple set of Inputs and Expected outputs.
I wouldn’t have wanted to make my parser public, it wasn’t part of my component my dependants should care about.
I hope to write more about my testing approaches in the future.
Another use case
For reasons I won’t go into, in one of the systems I work on a single “module” is comprised of a number of assemblies/projects, and the system is comprised of many modules. For this we use “InternalsVisibleTo” only so that the projects in the same module can see each other - in addition to unit testing as stated above.
This allows a single module to see everything it needs to, but dependant modules to only see what we choose to make visible. Keeping a small and focused API helps you know what others depend on and what the impact of your changes are.
Static Analysis
When you use static analysis like .NET Analysers they make assumptions about what your code’s purpose is based on the access modifier. To .NET Analysers, public code is library code, to be called by external consumers.
A few examples of things only apply to public class:
- Argument validation - you must check arguments are not null (also see below)
- Correct (or formal)
IDisposableimplementation. - Spelling checks
The options you have are disable these rules, suppress them, or add the requisite code to support them.
- Disabling the rules, means you don’t get the benefit of the analysis on any public code you may have that was written for use by external callers.
- Suppressing them is messy, and you should justify them so you remember why you disabled it.
- Adding requisite code is arduous. e.g. Guards against nulls.
When you are using Nullable Reference Types from C# 8.0 the compiler protects you from accidentally dereferencing null. But
publicmeans that anyone can write code to call it, so it errs on the side of caution and still warns you that arguments may be null and you should check them.Wrapping up
Given the limited value within a project of using
public, I always default tointernaland will test against internal classes happily, only usingpublicwhen I think something should be part of a public API to another person or part of the system.Internal types are only used by trusted and known callers. Nullable Reference type checking works well with them, as it knows they can only instantiated from within known code, allowing a more complete analysis.
If you are writing code for that is to be maintained for years to come by people other than yourself, using public or internal won’t help, you need to find other approaches to ensure that code is encapsulated and consumed appropriately.
-
SnowPi in F#
This post is part of the F# Advent Calendar 2020. Many thanks to Sergey Tihon for organizing these. Go checkout the other many and excellent posts.
SnowPi RGB
Back in July I got an email from KickStarter about a project for an RGB Snowman that works on Raspberry Pi’s and BBC micro:bits. My daughter loves building things on her micro:bit, and loves all things Christmassy, so I instantly backed it…

image from the KickStarter campaign
A few months later (and now in the proper season) my daughter has had her fun programming it for the micro:bit. Now it is my turn, and I thought it would make a good Christmas post if I could do it in F# and get it running on a Raspberry Pi with .NET Core / .NET.
Most of my Raspberry Pi programming so far has been with cobbled together Python scripts with little attention for detail or correctness, I’ve never run anything .NET on a Raspberry Pi.
This is my journey to getting it working with F# 5 / .NET 5 and running on a Raspberry Pi.
Getting going
After my initial idea, next came the question, “can I actually do it?”. I took a look at the Python demo application that was created for the SnowPi and saw it used
rpi_ws281x, a quick google for “rpi_ws281x .net” and, yep, this looks possible.However, that wasn’t to be. I first tried the popular ws281x.Net package from nuget, and despite following the instructions to setup the native dependencies, I managed to get from
Seg Fault!toWS2811_ERROR_HW_NOT_SUPPORTED, which seemed to indicate that my RPi 4 wasn’t supported and that I needed to update the native libraries. I couldn’t figure this out and gave up.I then tried rpi-ws281x-csharp which looked newer, and even with compiling everything from source, I still couldn’t get it working.
Getting there
After some more digging I finally found Ken Sampson had a fork of rpi-ws281x-csharp which looked newer than the once I used before, and it had a nuget package.
This one worked!
I could finally interact with the SnowPi from F# running in .NET 5. But so far all I had was “turn on all the lights”.
Developing
The problem with developing on a desktop PC and testing on an RPi is that it takes a while to build, publish, copy and test the programs.
I needed a way to test these easier, so I decided to redesign my app to use Command Objects and decouple the instructions from the execution. Now I could provide an alternate executor for the Console and see how it worked (within reason) without deploying to the Raspberry Pi.
Types
As with most F# projects, first, I needed some types.
The first one I created was the Position to describe in English where each LED was so I didn’t have to think too hard when I wanted to light one up.
type Position =
    | BottomLeft
    | MiddleLeft
    | TopLeft
    | BottomRight
    | MiddleRight
    | TopRight
    | Nose
    | LeftEye
    | RightEye
    | BottomMiddle
    | MiddleMiddle
    | TopMiddle
    static member All =
        Reflection.FSharpType.GetUnionCases(typeof<Position>)
        |> Seq.map (fun u -> Reflection.FSharpValue.MakeUnion(u, Array.empty) :?> Position)
        |> Seq.toList
The
Allmember is useful when you need to access all positions at once.I then created a Pixel record to store the state of a LED (this name was from the Python API to avoid conflicts with the
rpi_ws281xtype LED), and a Command union to hold each of the commands you can do with the SnowPi:type Pixel = { Position: Position Color : Color } type Command = | SetLed of Pixel | SetLeds of Pixel list | Display | SetAndDisplayLeds of Pixel list | Sleep of int | ClearSome of the Commands (
SetLedvsSetLedsandSetAndDisplayLedsvsSetLeds; Display) are there for convenience when constructing commands.Programs
With these types I could now model a basic program:
let redNose =
    { Position = Nose
      Color = Color.Red }
let greenEyeL =
    { Position = LeftEye
      Color = Color.LimeGreen }
// etc. Rest hidden for brevity

let simpleProgram = [
    SetLeds [ redNose; greenEyeL; greenEyeR ]
    Display
    Sleep 1000
    SetLeds [ redNose; greenEyeL; greenEyeR; topMiddle ]
    Display
    Sleep 1000
    SetLeds [ redNose; greenEyeL; greenEyeR; topMiddle; midMiddle; ]
    Display
    Sleep 1000
    SetLeds [ redNose; greenEyeL; greenEyeR; topMiddle; midMiddle; bottomMiddle; ]
    Display
    Sleep 1000
]
This is an F# List with 12 elements, each one corresponding to a Command to be run by something.
It is quite east to read what will happen, and I’ve given each of the Pixel values a nice name for reuse.
At the moment nothing happens until the program is executed:
The
executefunction takes a list of commands then examines the config to determine which interface to execute it on.Both Real and Mock versions of
executehave the same signature, so I can create a list of each of those functions and iterate through each one calling it with thecmdsarguments.let execute config cmds name = [ if config.UseSnowpi then Real.execute if config.UseMock then Mock.execute ] // (Command list -> Unit) list |> List.iter (fun f -> Colorful.Console.WriteLine((sprintf "Executing: %s" name), Color.White) f cmds)The
configargument is partially applied so you don’t have to pass it every time:let config = createConfigFromArgs argv let execute = execute config // I would have used `nameof` but Ionide doesn't support it at time of writing. execute simpleProgram "simpleProgram"Mock
The “Mock” draws a Snowman on the console, then does a write to each of the “Pixels” (in this case the Cursor is set to the correct X and Y position for each
[ ]) in the correct colour using Colorful.Console library to help.[<Literal>] let Snowman = """ ############### ############# ########### ######### ################# / \ / [ ] [ ] \ | | \ [ ] / \ / / \ / [ ] \ / [ ] [ ] \ / [ ] \ | [ ] [ ] | \ [ ] / \[ ] [ ]/ \_____________/ """The implementation is quite imperative, as I needed to match the behaviour of the Native library in “Real”. The
SetLedandSetLedscommands push aPixelinto aResizeArray<Command>(System.Collections.Generic.List<Command>) and then aRendercommand instructs it to iterates over each item in the collection, draws the appropriate “X” on the Snowman in the desired colour, and then clear the list ready for the next render.let private drawLed led = Console.SetCursorPosition (mapPosToConsole led.Position) Console.Write('X', led.Color) let private render () = try Seq.iter drawLed toRender finally Console.SetCursorPosition originalPosThis is one of the things I really like about F#, it is a Functional First language, but I can drop into imperative code whenever I need to. I’ll combe back to this point again later.
Using
dotnet watch runI can now write and test a program really quickly.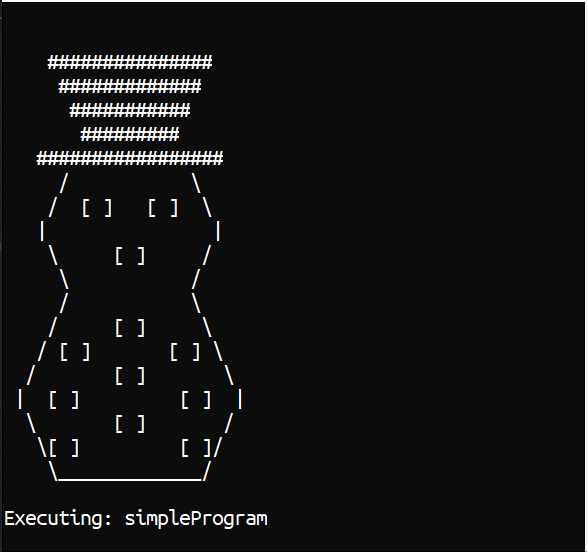
Real SnowPi
Implementing the “real” SnowPi turned out to be trivial, albeit imperative.
Just following the examples from the GitHub repo of the rpi-ws281x-csharp in C# and porting it to F## was enough to get me going with what I needed.
For example, the following snippet is nearly the full implementation:
open rpi_ws281x
open System.Drawing

let settings = Settings.CreateDefaultSettings();
let controller =
    settings.AddController(
        controllerType = ControllerType.PWM0,
        ledCount = NumberOfLeds,
        stripType = StripType.WS2811_STRIP_GRB,
        brightness = 255uy,
        invert = false)

let rpi = new WS281x(settings)

//Call once at the start
let setup() =
    controller.Reset();

//Call once at the end
let teardown() =
    rpi.Dispose()

let private setLeds pixels =
    let toLedTuple pixel =
       (posToLedNumber pixel.Position, pixel.Color)

    pixels
    |> List.map toLedTuple
    |> List.iter controller.SetLED

let private render() =
    rpi.Render()
The above snipped gives most of the functions you need to execute the commands against:
let rec private executeCmd cmd =
    match cmd with
    | SetLed p -> setLeds [p]
    | SetLeds ps -> setLeds ps
    | Display -> render ()
    | SetAndDisplayLeds ps ->
        executeCmd (SetLeds ps)
        executeCmd Display
    | Sleep ms -> System.Threading.Thread.Sleep(ms)
    | Clear -> clear ()
Other Programs
Just to illustrate composing a few programs, I’ll post a two more, one simple traffic light I created and one I copied from the Demo app in the Python repository:
Traffic Lights
This displays the traditional British traffic light sequence. First, by creating lists for each of the pixels and their associated colours (
createPixelsis a simple helper method). By appending the red and amber lists together, I can combine both red and amber pixels into a new list that will display red and amber at the same time.let red = [ LeftEye; RightEye; Nose] |> createPixels Color.Red let amber = [ TopLeft; TopMiddle; TopRight; MiddleMiddle ] |> createPixels Color.Yellow let green = [ MiddleLeft; BottomLeft; BottomMiddle; MiddleRight; BottomRight ] |> createPixels Color.LimeGreen let redAmber = List.append red amber let trafficLights = [ Clear SetAndDisplayLeds green Sleep 3000 Clear SetAndDisplayLeds amber Sleep 1000 Clear SetAndDisplayLeds red Sleep 3000 Clear SetAndDisplayLeds redAmber Sleep 1000 Clear SetAndDisplayLeds green Sleep 1000 ]The overall program is just a set of commands to first clear then set the Leds and Display them at the same time, then sleep for a prescribed duration, before moving onto the next one.
Colour Wipe
This program is ported directly from the Python sample with a slight F# twist:
let colorWipe col =
    Position.All
    |> List.sortBy posToLedNumber
    |> List.collect (
        fun pos ->
            [ SetLed { Position = pos; Color = col }
              Display
              Sleep 50 ])

let colorWipeProgram = [
    for _ in [1..5] do
        for col in [ Color.Red; Color.Green; Color.Blue; ] do
            yield! colorWipe col
The
colorWipefunction sets each Led in turn to a specified colour, displays it, waits 50ms, and moves onto the next one.List.collectis used to flatten the list of lists of commands into just a list of commands.The
colorWipeProgramrepeats this 5 times, but each time uses a different colour in the wipe. Whilst it may look imperative, it is using list comprehensions and is still just building commands to execute later.Full project
The entire project is on GitHub here, if you want to have a look at the full source code and maybe even get a SnowPi and try it out.
Summing up
The project started out fully imperative, and proved quite hard to implement correctly, especially as I wrote the mock first, and implemented the real SnowPi. The mock was written with different semantics to the the real SnowPi interface, and had to be rewritten a few times.
Once I moved to using Commands and got the right set of commands, I didn’t have to worry about refactoring the programs as I tweaked implementation details.
The building of programs from commands is purely functional and referentially transparent. You can see what a program will do before you even run it. This allowed me to use functional principals building up the programs, despite both implementations being rather imperative and side effect driven.
Going further, if I were to write tests for this, the important part would be the programs, which I could assert were formed correctly, without ever having to render them.
subscribe via RSS