SnowPi in F#
This post is part of the F# Advent Calendar 2020. Many thanks to Sergey Tihon for organizing these. Go checkout the other many and excellent posts.
SnowPi RGB
Back in July I got an email from KickStarter about a project for an RGB Snowman that works on Raspberry Pi’s and BBC micro:bits. My daughter loves building things on her micro:bit, and loves all things Christmassy, so I instantly backed it…
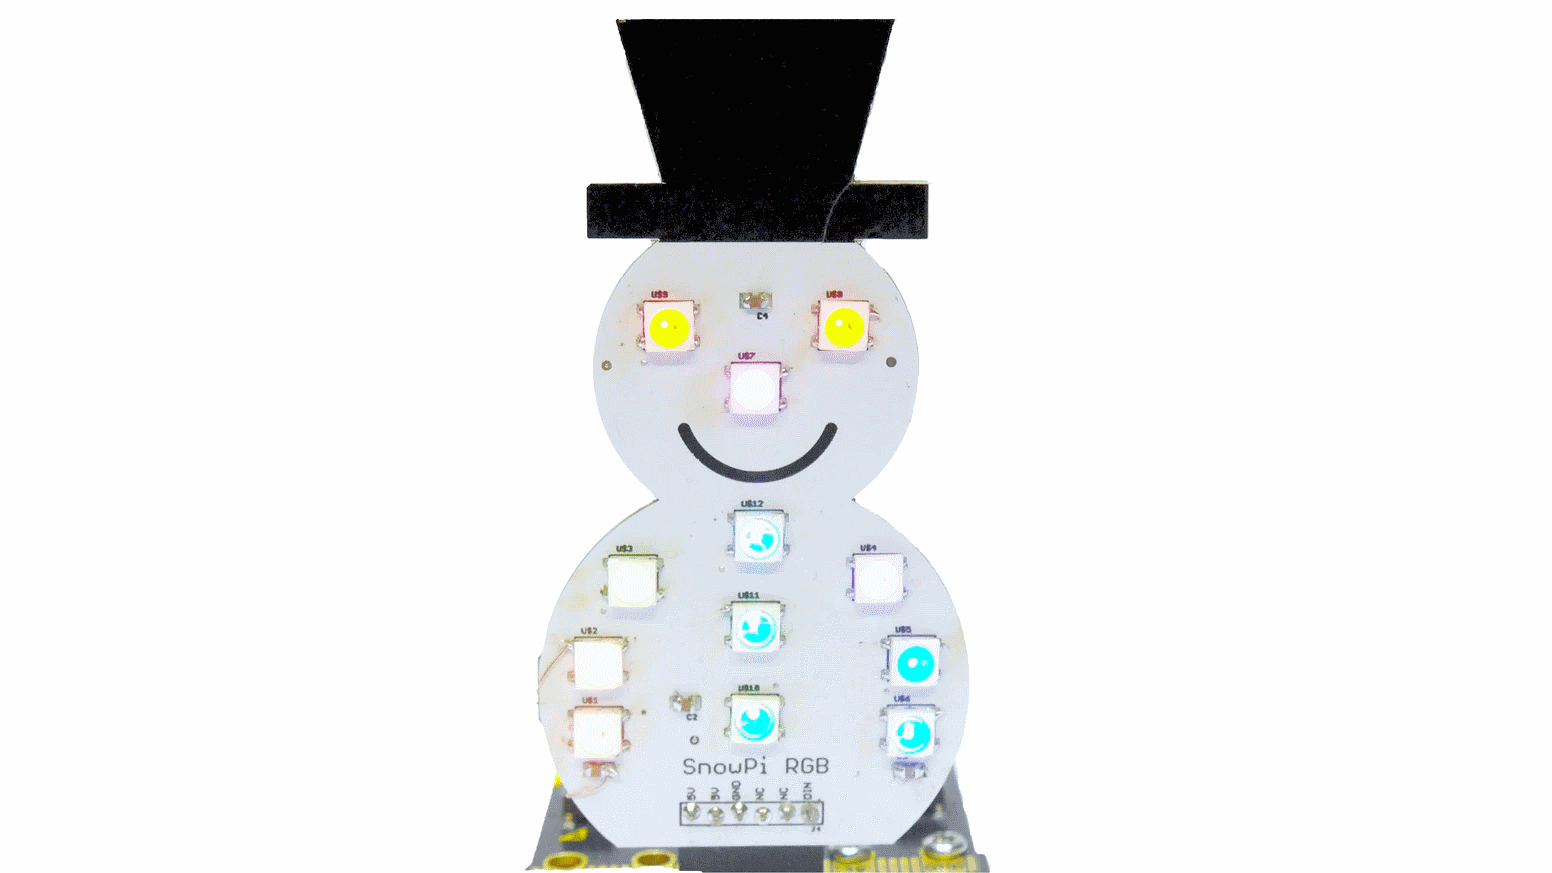
image from the KickStarter campaign
A few months later (and now in the proper season) my daughter has had her fun programming it for the micro:bit. Now it is my turn, and I thought it would make a good Christmas post if I could do it in F# and get it running on a Raspberry Pi with .NET Core / .NET.
Most of my Raspberry Pi programming so far has been with cobbled together Python scripts with little attention for detail or correctness, I’ve never run anything .NET on a Raspberry Pi.
This is my journey to getting it working with F# 5 / .NET 5 and running on a Raspberry Pi.
Getting going
After my initial idea, next came the question, “can I actually do it?”. I took a look at the
Python demo application that was created for the SnowPi and saw it used rpi_ws281x, a quick
google for “rpi_ws281x .net” and, yep, this looks possible.
However, that wasn’t to be. I first tried the popular ws281x.Net package from nuget, and
despite following the instructions to setup the native dependencies, I managed to get from
Seg Fault! to WS2811_ERROR_HW_NOT_SUPPORTED, which seemed to indicate that my RPi 4 wasn’t
supported and that I needed to update the native libraries. I couldn’t figure this out and gave up.
I then tried rpi-ws281x-csharp which looked newer, and even with compiling everything from source, I still couldn’t get it working.
Getting there
After some more digging I finally found Ken Sampson had a fork of rpi-ws281x-csharp which looked newer than the once I used before, and it had a nuget package.
This one worked!
I could finally interact with the SnowPi from F# running in .NET 5. But so far all I had was “turn on all the lights”.
Developing
The problem with developing on a desktop PC and testing on an RPi is that it takes a while to build, publish, copy and test the programs.
I needed a way to test these easier, so I decided to redesign my app to use Command Objects and decouple the instructions from the execution. Now I could provide an alternate executor for the Console and see how it worked (within reason) without deploying to the Raspberry Pi.
Types
As with most F# projects, first, I needed some types.
The first one I created was the Position to describe in English where each LED was so I didn’t have to think too hard when I wanted to light one up.
type Position =
    | BottomLeft
    | MiddleLeft
    | TopLeft
    | BottomRight
    | MiddleRight
    | TopRight
    | Nose
    | LeftEye
    | RightEye
    | BottomMiddle
    | MiddleMiddle
    | TopMiddle
    static member All =
        Reflection.FSharpType.GetUnionCases(typeof<Position>)
        |> Seq.map (fun u -> Reflection.FSharpValue.MakeUnion(u, Array.empty) :?> Position)
        |> Seq.toList
The All member is useful when you need to access all positions at once.
I then created a Pixel record to store the state of a LED (this name was from the Python API to avoid
conflicts with the rpi_ws281x type LED), and a Command union to hold each of the commands you can do
with the SnowPi:
type Pixel = {
    Position: Position
    Color : Color
}

type Command =
    | SetLed of Pixel
    | SetLeds of Pixel list
    | Display
    | SetAndDisplayLeds of Pixel list
    | Sleep of int
    | Clear
Some of the Commands (SetLed vs SetLeds and SetAndDisplayLeds vs SetLeds; Display) are there for
convenience when constructing commands.
Programs
With these types I could now model a basic program:
let redNose =
    { Position = Nose
      Color = Color.Red }
let greenEyeL =
    { Position = LeftEye
      Color = Color.LimeGreen }
// etc. Rest hidden for brevity

let simpleProgram = [
    SetLeds [ redNose; greenEyeL; greenEyeR ]
    Display
    Sleep 1000
    SetLeds [ redNose; greenEyeL; greenEyeR; topMiddle ]
    Display
    Sleep 1000
    SetLeds [ redNose; greenEyeL; greenEyeR; topMiddle; midMiddle; ]
    Display
    Sleep 1000
    SetLeds [ redNose; greenEyeL; greenEyeR; topMiddle; midMiddle; bottomMiddle; ]
    Display
    Sleep 1000
]
This is an F# List with 12 elements, each one corresponding to a Command to be run by something.
It is quite east to read what will happen, and I’ve given each of the Pixel values a nice name for reuse.
At the moment nothing happens until the program is executed:
The execute function takes a list of commands then examines the config to determine which
interface to execute it on.
Both Real and Mock versions of execute have the same signature, so I can create a list of each
of those functions and iterate through each one calling it with the cmds arguments.
let execute config cmds name =
    [
        if config.UseSnowpi then
            Real.execute
        if config.UseMock then
            Mock.execute
    ] // (Command list -> Unit) list
    |> List.iter (fun f ->
        Colorful.Console.WriteLine((sprintf "Executing: %s" name), Color.White)
        f cmds)
The config argument is partially applied so you don’t have to pass it every time:
let config = createConfigFromArgs argv

let execute = execute config

// I would have used `nameof` but Ionide doesn't support it at time of writing.
execute simpleProgram "simpleProgram"
Mock
The “Mock” draws a Snowman on the console, then does a write to each of the “Pixels” (in this case
the Cursor is set to the correct X and Y position for each [ ]) in the correct colour
using Colorful.Console library to help.
[<Literal>]
let Snowman = """

    ###############
     #############
      ###########
       #########
   #################
     /           \
    /  [ ]   [ ]  \
   |               |
    \     [ ]     /
     \           /
     /           \
    /     [ ]     \
   / [ ]       [ ] \
  /       [ ]       \
 |  [ ]         [ ]  |
  \       [ ]       /
   \[ ]         [ ]/
    \_____________/
"""
The implementation is quite imperative, as I needed to match the behaviour of the Native library in “Real”.
The SetLed and SetLeds commands push a Pixel into a ResizeArray<Command> (System.Collections.Generic.List<Command>)
and then a Render command instructs it to iterates over each item in the collection, draws the appropriate “X” on the Snowman
in the desired colour, and then clear the list ready for the next render.
let private drawLed led =
    Console.SetCursorPosition (mapPosToConsole led.Position)
    Console.Write('X', led.Color)

let private render () =
    try
        Seq.iter drawLed toRender
    finally
        Console.SetCursorPosition originalPos
This is one of the things I really like about F#, it is a Functional First language, but I can drop into imperative code whenever I need to. I’ll combe back to this point again later.
Using dotnet watch run I can now write and test a program really quickly.
Real SnowPi
Implementing the “real” SnowPi turned out to be trivial, albeit imperative.
Just following the examples from the GitHub repo of the rpi-ws281x-csharp in C# and porting it to F## was enough to get me going with what I needed.
For example, the following snippet is nearly the full implementation:
open rpi_ws281x
open System.Drawing

let settings = Settings.CreateDefaultSettings();
let controller =
    settings.AddController(
        controllerType = ControllerType.PWM0,
        ledCount = NumberOfLeds,
        stripType = StripType.WS2811_STRIP_GRB,
        brightness = 255uy,
        invert = false)

let rpi = new WS281x(settings)

//Call once at the start
let setup() =
    controller.Reset();

//Call once at the end
let teardown() =
    rpi.Dispose()

let private setLeds pixels =
    let toLedTuple pixel =
       (posToLedNumber pixel.Position, pixel.Color)

    pixels
    |> List.map toLedTuple
    |> List.iter controller.SetLED

let private render() =
    rpi.Render()
The above snipped gives most of the functions you need to execute the commands against:
let rec private executeCmd cmd =
    match cmd with
    | SetLed p -> setLeds [p]
    | SetLeds ps -> setLeds ps
    | Display -> render ()
    | SetAndDisplayLeds ps ->
        executeCmd (SetLeds ps)
        executeCmd Display
    | Sleep ms -> System.Threading.Thread.Sleep(ms)
    | Clear -> clear ()
Other Programs
Just to illustrate composing a few programs, I’ll post a two more, one simple traffic light I created and one I copied from the Demo app in the Python repository:
Traffic Lights
This displays the traditional British traffic light sequence. First, by creating lists for each of the
pixels and their associated colours (createPixels is a simple helper method).
By appending the red and amber lists together, I can combine both red and amber pixels into a
new list that will display red and amber at the same time.
let red =
    [ LeftEye; RightEye; Nose]
    |> createPixels Color.Red

let amber =
    [ TopLeft; TopMiddle; TopRight; MiddleMiddle ]
    |> createPixels Color.Yellow

let green =
    [ MiddleLeft; BottomLeft; BottomMiddle; MiddleRight; BottomRight ]
    |> createPixels Color.LimeGreen

let redAmber =
    List.append red amber

let trafficLights = [
    Clear
    SetAndDisplayLeds green
    Sleep 3000
    Clear
    SetAndDisplayLeds amber
    Sleep 1000
    Clear
    SetAndDisplayLeds red
    Sleep 3000
    Clear
    SetAndDisplayLeds redAmber
    Sleep 1000
    Clear
    SetAndDisplayLeds green
    Sleep 1000
]
The overall program is just a set of commands to first clear then set the Leds and Display them at the same time, then sleep for a prescribed duration, before moving onto the next one.
Colour Wipe
This program is ported directly from the Python sample with a slight F# twist:
let colorWipe col =
    Position.All
    |> List.sortBy posToLedNumber
    |> List.collect (
        fun pos ->
            [ SetLed { Position = pos; Color = col }
              Display
              Sleep 50 ])

let colorWipeProgram = [
    for _ in [1..5] do
        for col in [ Color.Red; Color.Green; Color.Blue; ] do
            yield! colorWipe col
The colorWipe function sets each Led in turn to a specified colour, displays it, waits 50ms, and moves
onto the next one. List.collect is used to flatten the list of lists of commands into just a list of commands.
The colorWipeProgram repeats this 5 times, but each time uses a different colour in the wipe. Whilst it may look imperative, it is using list comprehensions and is still just building commands to execute later.
Full project
The entire project is on GitHub here, if you want to have a look at the full source code and maybe even get a SnowPi and try it out.
Summing up
The project started out fully imperative, and proved quite hard to implement correctly, especially as I wrote the mock first, and implemented the real SnowPi. The mock was written with different semantics to the the real SnowPi interface, and had to be rewritten a few times.
Once I moved to using Commands and got the right set of commands, I didn’t have to worry about refactoring the programs as I tweaked implementation details.
The building of programs from commands is purely functional and referentially transparent. You can see what a program will do before you even run it. This allowed me to use functional principals building up the programs, despite both implementations being rather imperative and side effect driven.
Going further, if I were to write tests for this, the important part would be the programs, which I could assert were formed correctly, without ever having to render them.