Deployment Pipeline with VSTS and Release Management
Back in 2014 I wrote a UNC to URI Path Converter using ASP MVC 4 and Visual Studio Team Services with a XAML Build process template to continuously deploy the changes to an Azure Website. This was my first Azure Website and most of it was just using the default settings from the New Project dialog in Visual Studio, all very “point and click”.
It worked well and had an average of a few hundred page requests a week and so far, I’ve been happy with everything as it “just worked”. The other day I wanted to add a small feature and noticed that after pushing and deploying the change that Azure was warning me XAML builds would soon be deprecated. So, whilst I was making some changes I decided it would be a good opportunity for me to get up to date on a few new technologies that I have not used in anger.
I planned to setup the following for the website:
- Rewrite in .NET Core.
- Custom VSTS Build vNext.
- Deployment Pipeline using Microsoft Release Management.
Rewrite in .NET Core
My previous .NET Core app at this point was a console application, so I took this as an opportunity to get to grips with setting up a build
and a suite of unit tests using xUnit.net. Getting this working in Visual Studio was straight forward following the xUnit.net documentation, but getting
the build to run on VSTS was a bit hit and miss. I eventually settled on a mix-match combination of dotnet command line tools and the
Visual Studio Test Runner.
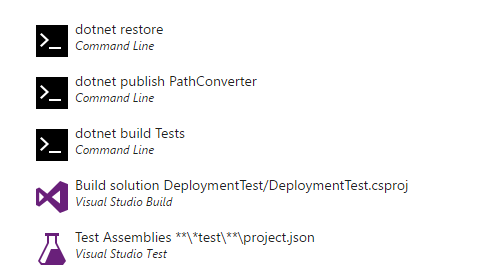
Using the VS Test step solved the problem with dotnet test not been able to run the xUnit.net tests on the build server. I kept the individual
dotnet restore, dotnet publish (site) and dotnet build (tests) as I wanted control over the publish. I also have a suite of deployment
tests that based on the Full .NET Framework which I build using VS Build. These were the building blocks of my pipeline.
Custom VSTS Build vNext
By keeping control over dotnet publish I could pack the website ready to by pushed to Azure using Microsoft Release Management. I took
the output of dotnet publish and zipped it up into an archive and published this as a build artifact.
The build process also took the output of DeploymentTests build and zipped it into a separate archive and published that too.
I now had a website and a suite of “Deployment Tests” as artifacts from my build.
Deployment Pipeline using Microsoft Release Management
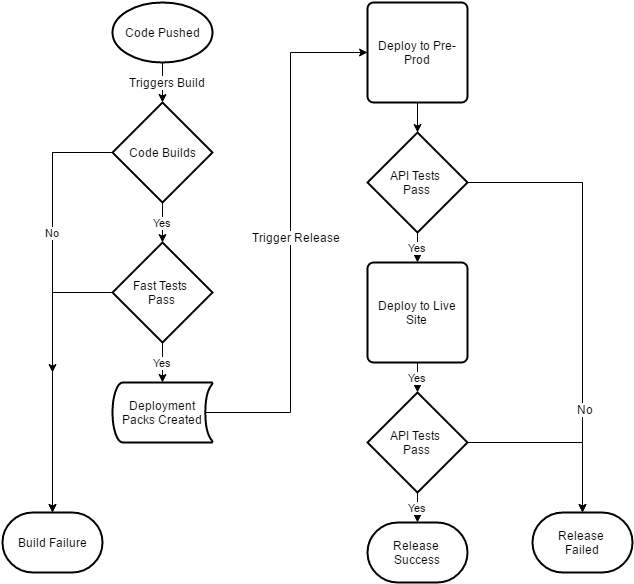
A deployment pipeline is where code goes through various stages and each stage provides increasing confidence, usually at the cost of extra time (Martin Fowler: DeploymentPipeline). My pipeline was quite simple:
Build -> Fast Tests -> Deploy to Pre-Prod -> Test Via API -> Deploy to Live -> Test Via API
This process meant that the build was fast and only ran isolated fast unit tests against the code. Only then did it deploy onto a Pre-Production server (another Free Azure Website), and run a set of integration tests against the Website via the API, if these tests passed, then I repeated the process onto the Live website.
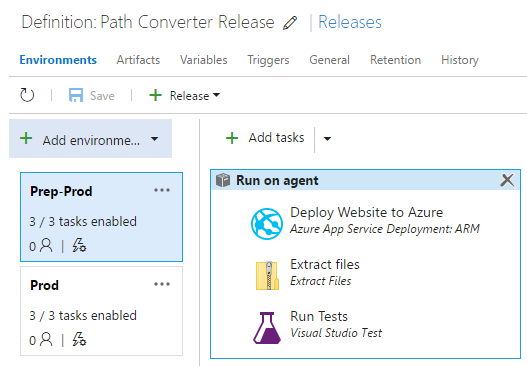
Using Microsoft Release Management, I was able to orchestrate this using a single Release definition, and defining two environments to deploy to.
I considered using Deployment Slots on Azure to do a deploy and then swap to the Slots after the tests passed, but Slots are only available on the Standard pricing tier and I wanted to keep this free, so I setup another free Website instance and ran the tests on there.
I used a Variable against each Environment in Release Management to store the Azure Website Name.
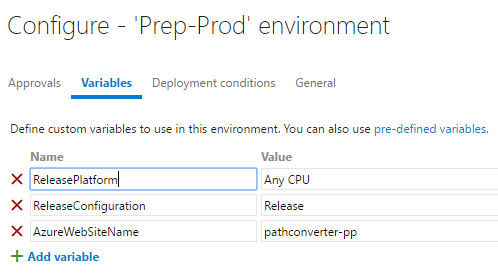
These variables had two uses, the first was to keep the steps for each environment the same, I only need to set the variable to a different value.
The second was very cool, because the variables in TFS Build and RM are actually environment variables I could write the following method in the code of my deployment tests:
public static String BaseUri => $"http://{Environment.GetEnvironmentVariable("AzureWebSiteName")}.azurewebsites.net/";
And then run the API integration tests against the value of BaseUri.
I planned to write some User Interface tests using either Coded-UI or Selenium, but due to the Hosted Build agents not supported Interactive Mode which is needed to run User Interface tests, I made them conditional and they only run in Visual Studio locally. I do have a plan to get these running in the future.
The whole process looks like this:
Conclusion
Whilst this is a massively over engineered solution for such a simple website, it was fun to learn some new tricks and understand how to put a release pipeline together using the VSTS and Azure platforms. I also used it as opportunity to tidy up my resources in Azure and consolidate all my related resources into an Azure RM Resource Group, including the Application Insights I use to monitor it.